• PORTFOLIOS
  • AP Portfolios
  • Tutorials
  • Instagram
Blair Academy Photography

Blair Academy Photography

  • PORTFOLIOS
  • AP Portfolios
  • Tutorials
  • Instagram

How to Create Vinyl Stickers to Incorporate in Portraits

Jade.jpg
Zeynep.jpg
Onome.jpg
Aidan.jpg
Jasmine.jpg

By Anh Nguyen '18

INSPIRATION

Photographer Peter Devito

"Are you the man in the relationship?" @fk.nyc for @satellitejournal LINK STILL IN BIO👌

2,442 Likes, 27 Comments - PJ DeVito (@peterdevito) on Instagram: ""Are you the man in the relationship?" @fk.nyc for @satellitejournal LINK STILL IN BIO👌"

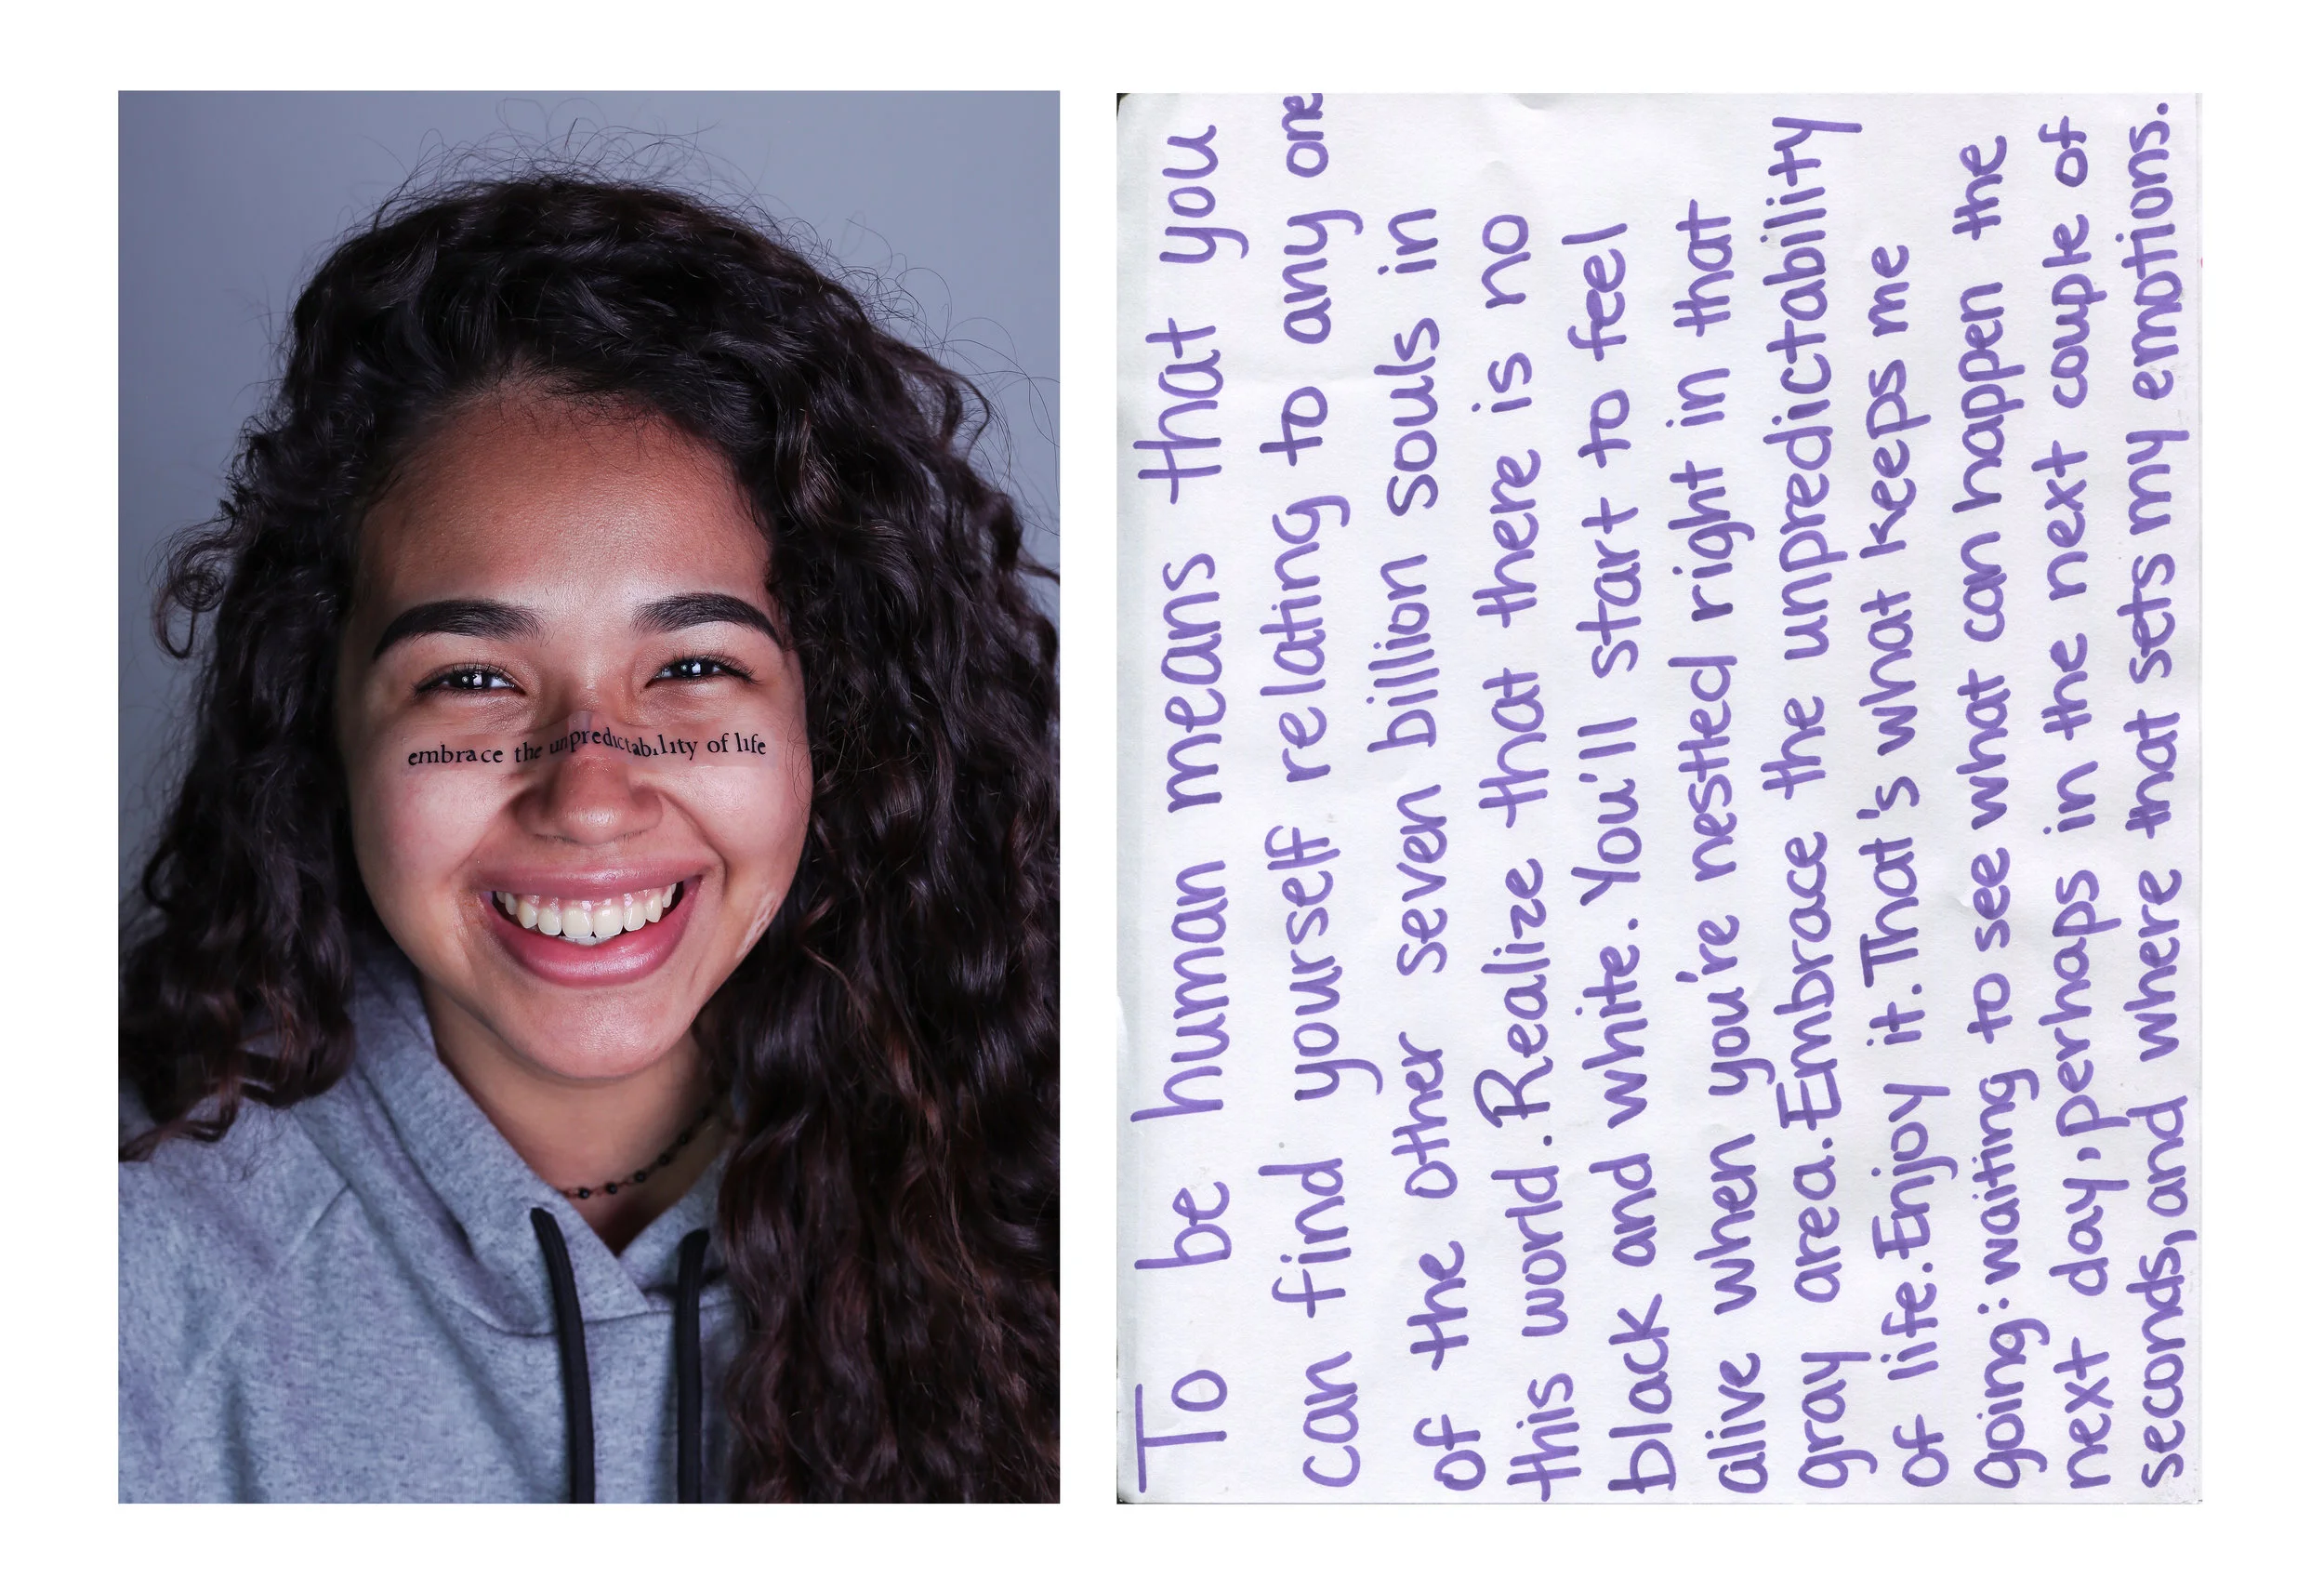
Photographer John Yuyi

#throwback "Julia's twitter" 201607 Tokyo @juliasumire Talking about "SMAD" on i-D CHINA. Article (in Chinese) Link in bio

8,057 Likes, 26 Comments - JOHN YUYI (@johnyuyi) on Instagram: "#throwback "Julia's twitter" 201607 Tokyo @juliasumire Talking about "SMAD" on i-D CHINA. Article..."

In this blog tutorial we are going to create pseudo temporary tattoos. Much like in the images seen above, temporary tattoos are very common because they can be customized, they’re easy to apply, they give a holographic projection look – creating cool images – and they’re a great alternative for getting the cool aesthetics of tattoos, but without the permanent aspect! I personally wanted to make this because I was inspired by the two photographers above and I think it's an interesting way for me to further portray people's stories in photographs.

This tutorial is a guide to recreating that look using a vinyl sticker cutter.

STEPS

step 1.JPG
  • Creating the Design

1. Use Inkscape to create the Design

2. Use Text tool to type the words you want to print.

3. Save the design as a PDF


  • Printing the design

1. Open the PDF on VinylMaster Cut

2. Make sure the design is the correct size (in inches or cm) that you want it to be.

IMG_6297.JPG

3. Place Vinyl paper in machine and make sure it is lined up

4. Send design to Vinyl cutter machine [File > Cut/ Plot > Send to Cutter]

IMG_3558.JPG


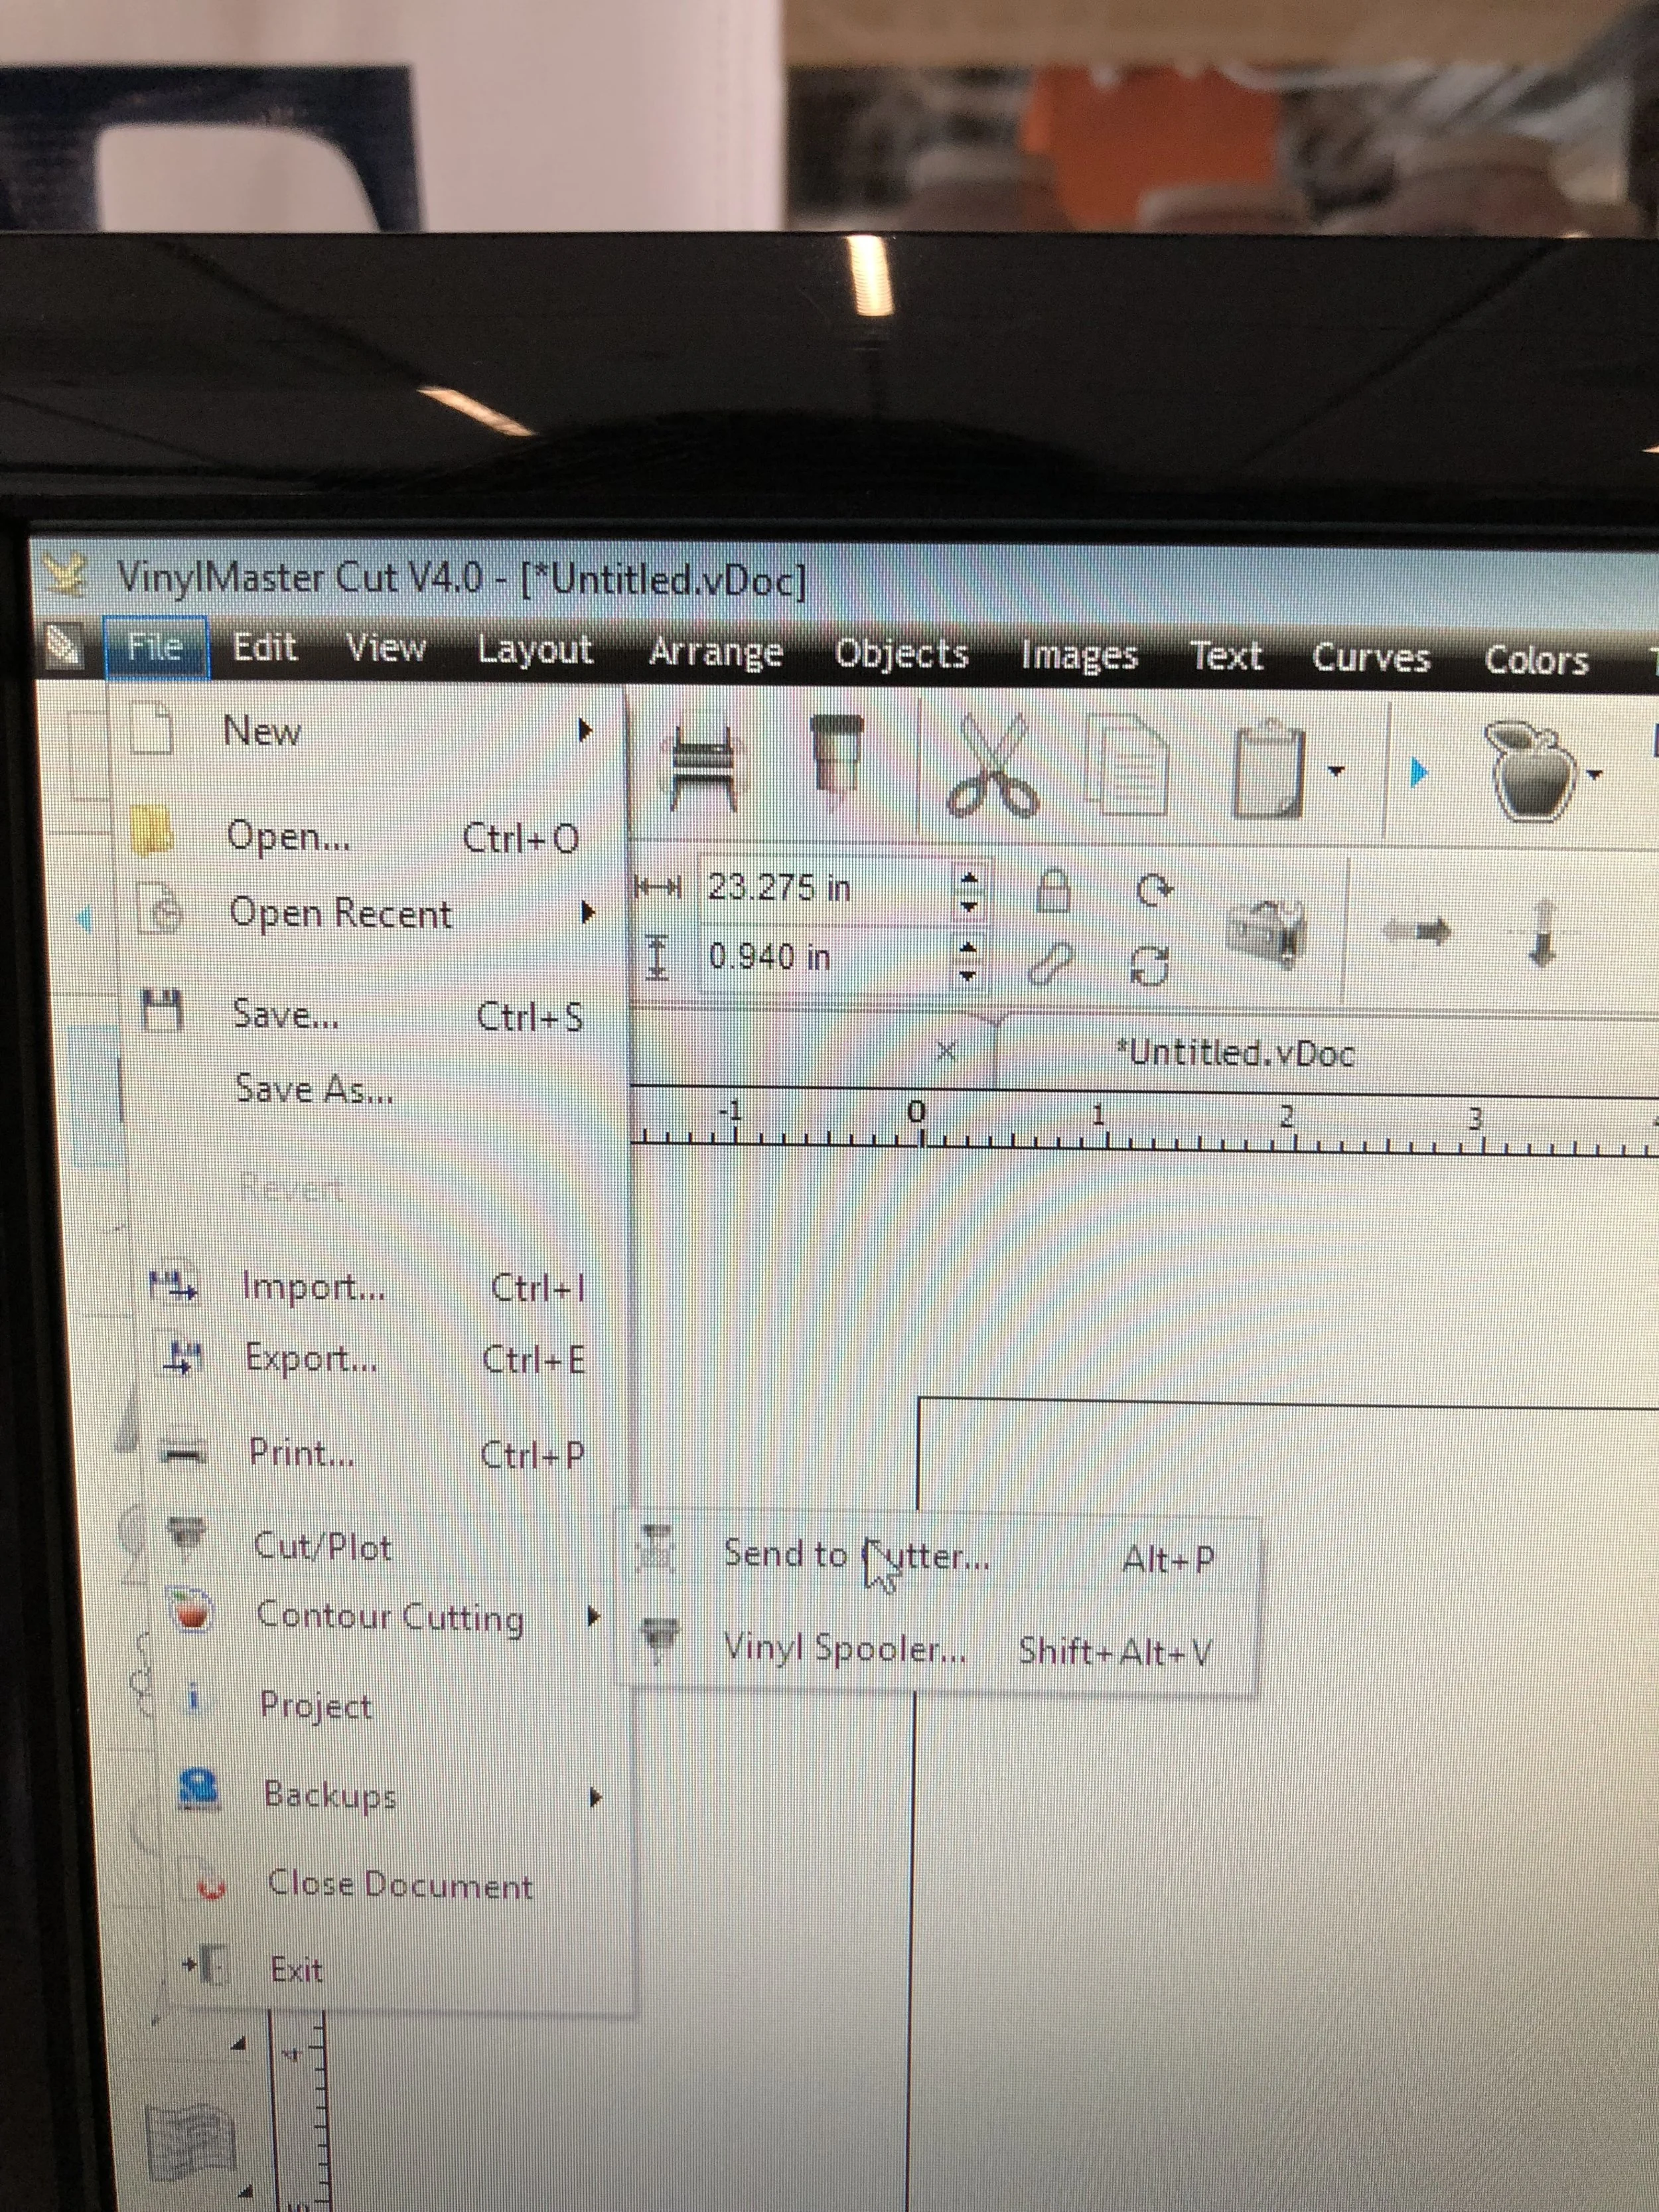
5. When you’re happy with the way the design looks, press “Cut Now” and watch the vinyl cutter create the design.


  • Creating the sticker
IMG_3184.JPG

1. Remove from vinyl cutter

2. Using a small pin, pick out the parts of the unwanted parts of the sticker, leaving  behind only the text (it will be easier to cut the sticker into a small size first and then pick it out)

3. With the text remaining, apply it onto sticker tape and cut the precise size so that it is ready to remove whenever needed to use.


When ready to use, peel the sticker tape off and the words will be left attached on the tape. Throw the white paper away and use the sticker to apply onto subject!

tags: Makerspace, Vinyl
categories: Tutorial
Saturday 05.05.18
Posted by Anh Nguyen
 

How to Laser Engrave a Photo onto Wood

temporary (17).jpg

By Jillian Rogers '19

To complete this please note that the laser engraver is in the basement of the CIC. When you use it for this purpose, you will need to coordinate with a faculty member in the Makerspace or work with a certified student to follow these steps. The Makerspace is always available from 8-10pm. 

1. CHOOSE A PHOTO YOU WANT TO PRINT (SIMPLE, DARK IMAGES WORK BEST)

thumb_IMG_1688_1024.jpg
temporary (17).jpg
thumb_IMG_9200_1024.jpg
thumb_DSC_0230_1024.jpg
temporary (1).jpg

Butterfly photo: I personally thought this photo engraved the best. The photo has great texture and a simple background which printed nicely.

Bridge photo: The negative space in this photo interrupted with the material I used and it engraved too dark.

Flipping hair photo: This photo worked well with being engraved because of the simple background and great texture in the hair.

Eyes photo: This photo also engraved well, but it made the face look washed out.

2. SET UP PHOTO ON ADOBE ILLUSTRATOR. 

The illustrator document needs to have a 40 x 28 canvas size. Make sure you size the image to match the material.

thumb_IMG_1689_1024.jpg

3. GO TO FILE, PRINT, PREFERENCES

thumb_IMG_1690_1024.jpg

4. TYPE IN THESE SETTINGS:

SPEED = 45%

POWER = 45%

DITHER = BRIGHTEN

(WORKS BEST ON CHERRYWOOD)

thumb_IMG_1691_1024.jpg

5. MAKE SURE THE PHOTO ALIGNS WITH THE DIMENSIONS OF THE MATERIAL YOU PRINT ON

thumb_IMG_1692_1024.jpg

6. GO TO FILE AND PRINT PHOTO

7. ENJOY YOUR PRINT!

thumb_IMG_1695_1024.jpg
tags: Laser Engraved Photo, Wood, Makerspace
categories: Tutorial
Friday 04.27.18
Posted by Jillian Rogers
 

Blair Academy Photography Powered by Squarespace.